Showing posts with label CHS-2. Show all posts

CHS NC-II

>VI<


This provides examples, hint and basic outline of the examination of TESDA in Computer Hardware and Servicing NC II


6. QUESTIONING/INTERVIEW (Oral) 

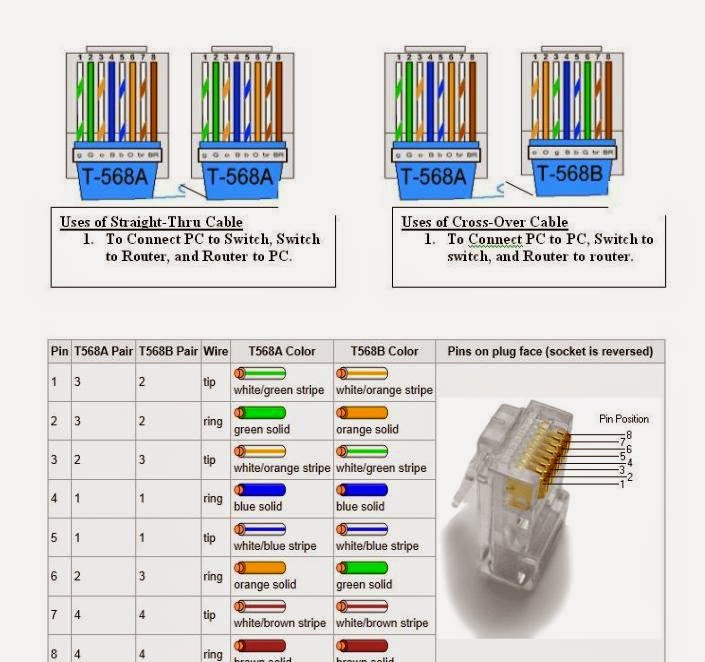
 Most of the questions will be on troubleshooting but anything around the subject matter can be asked. You also need to master the parts of the computer particularly of the Main Circuit Board or the Mother Board and their specific functions and cable colour‐coding.
Central Processing Unit (CPU)
Interpret and carries out basic instructions that operate a computer

Heat Sink – Components with fins that cools processor

Random Access Memory (RAM) – Memory chips that can be read from and written to by processor. Also called main memory or primary storage, most RAM is volatile; information inside it is lost when computer’s power is turned off.

Read Only Memory (ROM) – Memory chips that store permanent data and instructions.Non volatile memory, information in ROM is not lost when the computer power is off.

Basic Input Output System (BIOS) – The first program to run when you turn on your computer. It is stored in ROM chip on the motherboard.

Complementary Metal Oxide Semiconductor ‐ Stores date, time and computer start up information. Maintain by a small battery after you turn the computer off.

Adapter Card – Enhances system unit or provides connections to external devices called peripherals; also called expansion card.

Expansion Slot – An opening or socket on the motherboard that can hold adapter card.

Port – Connects external devices to system unit

Connector – Joins cable to peripheral

CHS NC-II

>V-b<


This provides examples, hint and basic outline of the examination of TESDA in Computer Hardware and Servicing NC II

5. CONFIGURE AND PRINT 5-b

CHANGING WORKGROUP AND COMPUTER NAME:

~ Start  > Settings > Control Panel > System > Computer Name tab > Change Tab > Type new Computer Name and Workgroup > OK, OK, OK, restart


INSTALLING NETWORK PRINTER

~Start > Settings > Control Panel > Printer and Faxes > Add Printer (PrinterTasks) > Add Printer Wizard >Next > Select “A network printer, or …. “ > Next > Browse Printer > Next > Select Installed Network Printer > Next > Yes > Finish!

Note: Turn of your firewall before installing printer

FILE/FOLDER SHARING

~Right click folder to share > Properties > Sharing Tab > Network Sharing  and Security(Click “If you understand the Security Risk…”) > Just Enable Sharing > OK > Select share this folder on the network > OK

SHARING PRINTER
Start > Settings > Control Panel > Printer and Faxes > Right Click Installed Printer > Sharing > Share this printer > OK 


CHS NC-II

>V-a<

This provides examples, hint and basic outline of the examination of TESDA in Computer Hardware and Servicing NC II

5. CONFIGURE AND PRINT (Actual)
  • Click on the start menu and click Control Panel
  • When the control panel window opens you will see items in either Category View (Continue with step #3) or Classic View (Skip to item #4)
  • Find and double click on the Network and Internet Connection icon.
  • Next, find and double click on the Network and Internet Connection icons. A window will open with all network connections available on the computed (wired and wireless.) 
  • Find the network connection you want to manually configure, right click on it and select Properties from the pop‐up menu
  • In the connection properties window, under the section labelled “This connection used the following items:” find the Internet Protocol (TCP/IP) item and double click it.
  • A new window will open; select the second radio button which is labelled “Use the following IP Address”.
  • Enter the appropriate IP Address (192.168.0.1); subnet mask usually 255.255.255.0 and the gateway (the router or the proxy server address).
  • The next part of the windows will now have a radio button selected which is labelled “Use the following DNS server addresses”
  • If you need to access the internet, enter the address provided by your ISP; if you do not have that information you can use the Open DNS server IP (208.67.222.222 and 208.67.220.220).
  • After entering the required information, click the OK button twice and close the control panel window.


CHS NC-II

>IV<


This provides examples, hint and basic outline of the examination of TESDA in Computer Hardware and Servicing NC II


4. INSTALL OPERATING SYSTEMS (OS – XP/2000/98, Dual Boot), DEVICE DRIVERS, LAN CABLE (Actual)


The type of operating system to be installed might change overtime. For LAN cable colour coding memorize the pairings below.


CHS NC-II

>III<


This provides examples, hint and basic outline of the examination of TESDA in Computer Hardware and Servicing NC II

3. ASSEMBLE SYSTEM UNIT (Actual)

Proper assembling procedure:

  1.  Prepare the computer case (Install power supply, I/O shield and spacers)
  2.  Install drives (DVD, Floppy and HDD)
  3.  Install the CPU, fan, heat sink and memory module on the motherboard
  4.  Install the motherboard into the casing and expansion cards
  5.  Install the cablings (Power connectors, FDD Connector, IDE/SATA Connector, USB headers and system panel header).
  6. Attach the monitor, keyboard, mouse and plug into a power source.
  7. Troubleshoot if necessary
  8. Assemble and install network connection


CHS NC-II

>II<


This provides examples, hint and basic outline of the examination of TESDA in Computer Hardware and Servicing NC II

2. OCCUPATIONAL HEALTH AND SAFETY PROCEDURE (Written)

  • Always ground or discharge yourself before touching any part of the computer
  • Do not work alone so that there’s someone who can take care of you in case of accident or emergency.
  •  Be careful with the tools that may cause short circuit
  • Always full the cable connector on the handle and not on the cable itself
  •  Use only rubber shoes when standing on the ground or in a concrete floor
  •  Make sure that the pins are properly aligned when connecting a cable connector.
  •  Always power off and unplug the computer before working on it.
  •  Take away any liquid such as mineral water or soft drinks near your working area or near computers.
  • Contingency measures during workplace accidents, fire and other emergencies are recognized.
  • Personal protective equipment is correctly used in accordance with organization OHS procedures and practice.
  • Hazard/risks in the workplace and their corresponding indicators are identified to minimize or eliminate risk to coworkers, workplace and environment.
  • Take necessary precautions to protect the component of the computer from damaged cause by Electrostatic Discharge (ESD).
  •  Hold the components by edges and do not touch the IC’s.
  •  Read and follow instruction on the manual carefully.
  •  Do not use excessive force if things don’t quite slip into place.